Hello everyone,
Today I am sharing a short article about how I create my own 3D miniatures for my tabletop role-playing games. These were made for our Dungeons and Dragons campaign, Phandelver and Below: The Shattered Obelisk.
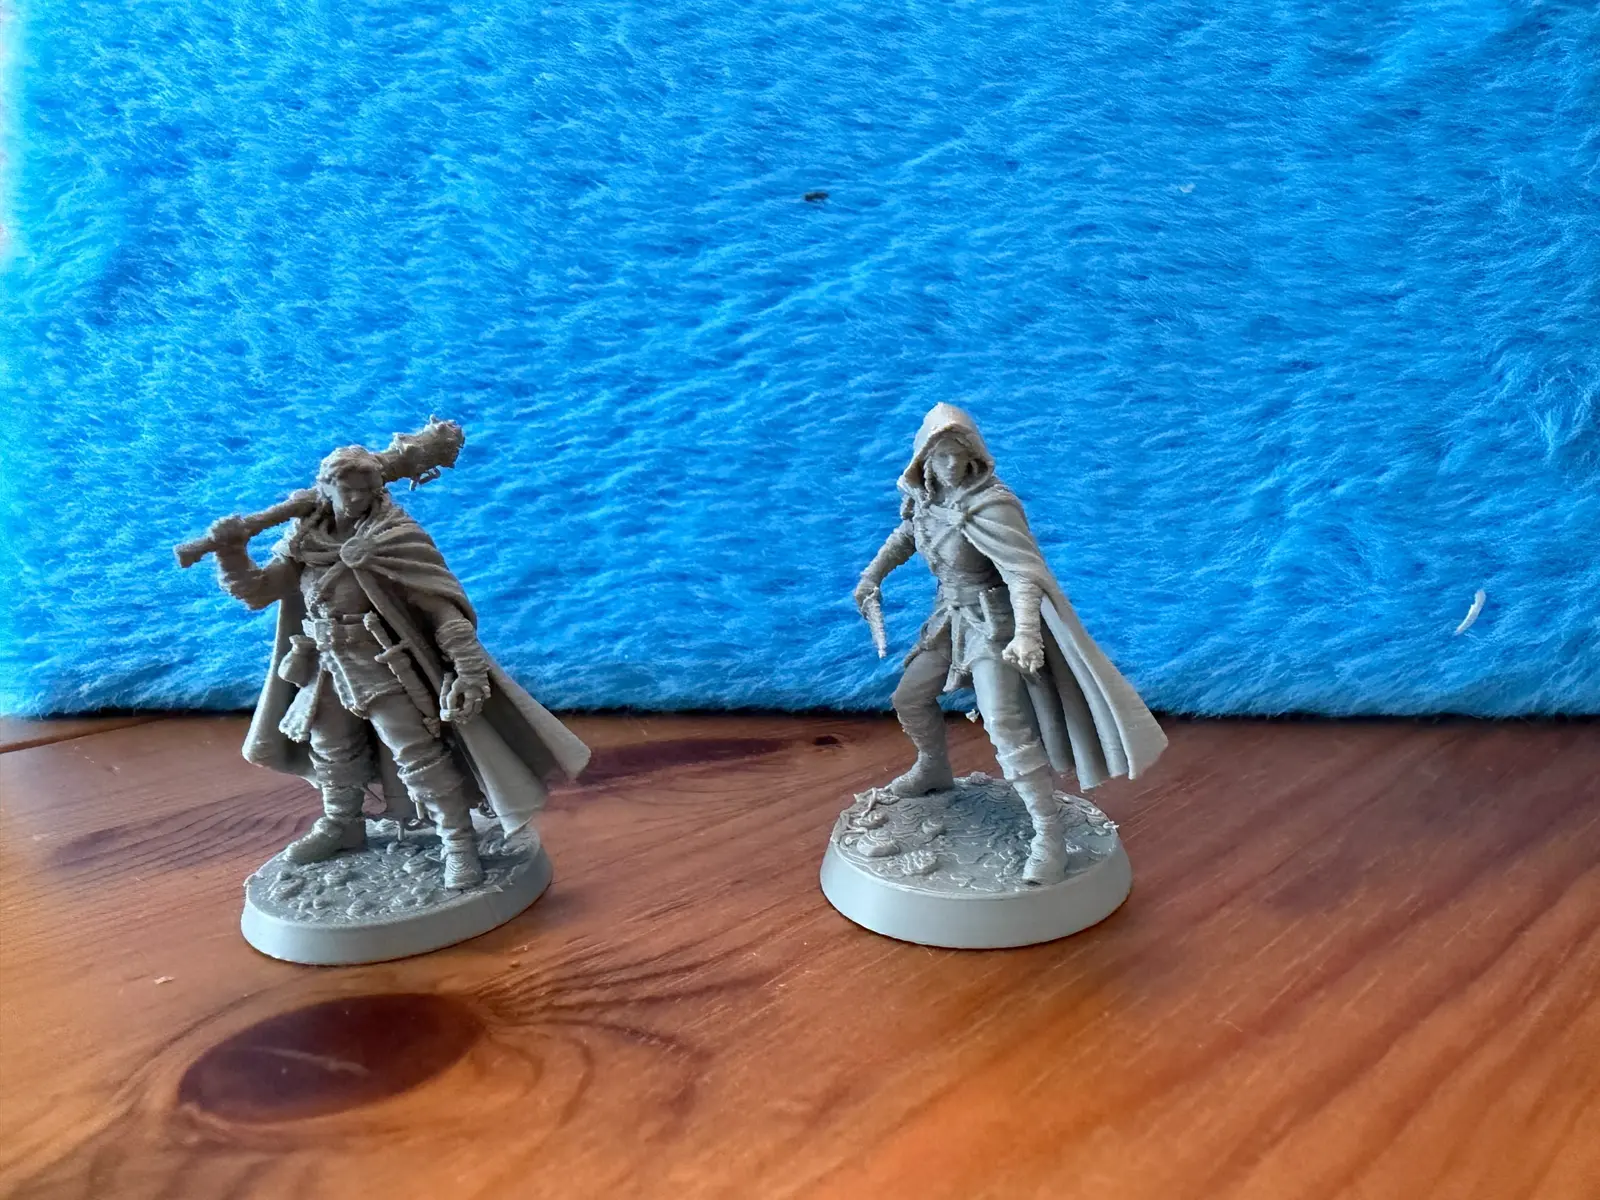
For this new project, we are about to begin Chapter 2 of the campaign. Without spoiling what awaits my players, I can share one tiny teaser: they will soon cross paths with the Redbrands. I therefore decided to create two female members of this rather disreputable gang.
If you missed the beginning of the adventure, you can read the story of our first night beneath the Shattered Obelisk.
The hardware and software I use
My process relies on four tools:
- ChatGPT Plus, to turn a character description into a reference image — paid subscription;
- Meshy Pro, to convert that image into a 3D model — paid subscription;
- Bambu Studio, the slicer that prepares the model for printing;
- my Bambu Lab X2D, which I may already have mentioned I am absolutely crazy about!
For these prints, I use a 0.4 mm nozzle on the X2D. This is neither a perfect method nor a universal profile. These are simply the settings that currently work best with my hardware, my miniatures and the way I print. Think of them as a useful starting point to adapt to your own printer, nozzle diameter, filament and model geometry.
Step one: create the reference image with ChatGPT
I begin in the ChatGPT workspace dedicated to my Dungeons and Dragons campaigns. During campaign preparation, I gather useful information there about locations, encounters and characters.
Using a character description, I ask ChatGPT to create a reference image designed for a 32 mm Dungeons and Dragons miniature: a full-body view on a base, with a clear silhouette and a pose that can realistically be printed.
That last point matters. A beautiful illustration does not necessarily make a good miniature. For FDM printing, I therefore try to avoid the following from the outset:
- staffs, blades or accessories that are far too thin;
- fingers spread too far apart;
- elements floating far away from the body;
- heavily torn or perforated capes, or capes made of very fine points;
- poses in which the feet do not rest properly on the ground.
Sometimes it is better to make a weapon slightly thicker or move an arm closer to the body. The image may look a little less realistic, but the miniature will be far more likely to survive printing, support removal and, most importantly, several gaming sessions.
When I am happy with the image, I save it for use in Meshy.


These images are not merely attractive illustrations. They are already designed as future miniatures, with a stable pose, sufficiently thick details and a clearly visible base.
Step two: turn the image into a 3D model with Meshy
I then sign in to my Meshy Pro account. Meshy now includes an AI agent capable of chaining several operations together, and it also lets users create custom skills.
I prepared one specifically for this workflow: “32 mm Dungeons and Dragons miniature with a solid base.”
I explicitly specify a solid base because Meshy sometimes tends to generate a hollow one. That can become awkward during slicing: the base may be less robust, require supports inside it or make the print unnecessarily complicated.
In the agent, I add:
- the image created with ChatGPT;
- my custom skill for 32 mm miniatures;
- the Meshy 7 model;
- Ultra mode.
I generally leave everything else unchanged. When the image and skill are correctly taken into account, the first model can already be usable.
At the time of writing, generating a model with Meshy 7 costs 25 credits. If the agent considers the object insufficiently watertight or detects problems that may affect 3D printing, it can suggest a printability repair for an additional 10 credits. In that case, a completed miniature costs me around 35 credits. Credit pricing can change, however, so it is worth checking the cost shown by Meshy before launching the operation.
You can view one of my models here: view the model on Meshy.
Before moving on, I mainly check four things: is the base fully closed? Do both feet touch the ground correctly? Are the weapons thick enough? Can the cape sections be supported without creating an impossible forest of material to remove?
Step three: prepare the miniature in Bambu Studio
Once I am happy with the model, I export it and open it in Bambu Studio.
At first, I always worked at the 32 mm scale. Because I use a screen laid flat on the table and can display slightly larger grid squares, however, I decided to enlarge some miniatures. I find their details easier to read and the overall effect more striking. The miniatures shown in the photographs are therefore about 40 to 42 mm tall.
Of course, you do not have to do the same. If you play on a standard grid or use physical scenery scaled for 32 mm miniatures, it is better to keep the scale consistent across the table.
Layer height
All the settings below were used with a 0.4 mm nozzle.
For enemies and monsters, I generally use the 0.12 mm High Quality @BBL X2D profile. The finish remains very good while print times stay reasonable, which matters when several opponents need to reach the table.
For heroes or important characters, I may go down to 0.08 mm. The improvement is most noticeable on faces, folds in clothing and small accessories, but the print time increases considerably.
The settings that make my miniatures stronger
The labels below match the English interface in Bambu Studio.
Quality → Wall generator → Arachne
I select Arachne without changing any of the additional options that appear.
Unlike the classic wall generator, which works mainly with a constant extrusion width, Arachne can vary the width of its lines. On a miniature full of narrow areas — fingers, blades, cape edges, accessories or facial details — this helps it follow the geometry more closely and print elements that might otherwise be ignored or poorly filled.
Strength → Wall loops → 4
I set Wall loops to 4. This parameter determines the number of walls printed on each layer. Increasing the number thickens the miniature’s shell, strengthening areas such as arms, legs and accessories.
On a small miniature, this setting is often more important than infill: some areas are so thin that they consist almost entirely of walls.
Strength → Sparse infill density → 20%
I increase the infill density to 20% and choose the Cubic pattern.
Cubic infill creates a three-dimensional internal structure that supports the part in several directions. Here it provides a good balance between strength, weight, filament use and printing time. On very thin parts of a miniature, however, the walls still do most of the work.
Speed → Inner wall → 100 mm/s
I limit the inner-wall speed to 100 mm/s. My miniatures contain many changes of direction and fragile details; slowing this part of the print helps maintain more consistent extrusion and reduces excessively abrupt movements.
This is not an absolute guarantee of strength, but it is a setting with which I obtain more consistent results.
Step four: tame the supports
In my experience, supports remain the most delicate part. There is no magic setting that works for every miniature: a cape, weapon, lock of hair or outstretched arm can completely change the outcome.
Nevertheless, this is the starting point I use most often:
- Enable support: enabled;
- Type: Tree (auto);
- Style: Slim or Organic, after comparing them in the preview;
- Threshold angle: up to 65°;
- On build plate only: enabled;
- Support critical regions only: enabled;
- Remove small overhangs: enabled;
- Branch distance: 6 to 7 mm;
- Branch diameter: 1 mm.


The Threshold angle tells Bambu Studio which slopes need support. The software generates supports beneath overhangs whose slope angle is below the selected value. Raising it to 65° therefore makes detection more cautious and supports more inclined areas. On a highly detailed miniature, this can save an arm, weapon or section of cape; the trade-off is that more material has to be removed after printing.
On build plate only prevents supports from using the miniature’s own surface as their foundation. The branches must begin on the build plate, which notably prevents the top of the base from becoming a starting point for additional supports — provided those branches can actually reach every required area. Their tips will, of course, still touch the parts they need to support.
With Support critical regions only, the slicer focuses on areas considered most at risk, such as tips, overhanging sections and certain small isolated details. Despite its slightly misleading name, Remove small overhangs does not remove parts of the model: it simply avoids creating supports beneath small overhangs that the printer should be able to handle on its own.
Finally, a Branch distance of 6 to 7 mm spaces the ramifications farther apart and prevents them from becoming too numerous. Reducing Branch diameter to 1 mm creates thinner branches that are generally easier to break and remove. The drawback is obvious: the supports themselves are less sturdy. That is why I always slice the model, inspect every layer in the preview, and compare Slim with Organic before starting the print.
These two screenshots also show how quickly a cape can require a small forest of supports. The aim is not to use as few as possible at all costs, but to place enough in the right areas without trapping the miniature inside a plastic cage.
Step five: remove the supports without breaking everything
Once printing is complete, I resist the urge to tear everything away immediately. I allow both the miniature and build plate to cool completely; sometimes I even wait up to twelve hours. A short spell in the refrigerator can also make separation easier in some cases.
Be careful, though: cold PLA also becomes more brittle. The supports may come away more easily, but so can a blade, hand or section of cape! I therefore work slowly, without twisting the miniature.
For this operation, I use:
- a small pair of precision pliers;
- when necessary, a magnifying lamp attached to my desk;
- plenty of patience.
I begin with the large outer branches, then work my way towards the smallest contact points. If a support resists near a weapon or an arm, I would rather cut it into several pieces than pull it off in one go.


The result
Using this method, I have gone from miniatures that sometimes weighed barely two grams and were extremely fragile to models that are noticeably stronger. Switching to four walls, using Arachne, applying 20% cubic infill and preparing the supports more carefully have clearly improved my results.
The process is not entirely automatic, however. AI provides an excellent starting point, but you still need to think like a model maker: thicken elements that are too fine, check the base, choose the right scale, inspect the sliced model and adapt the supports to each pose.
That is also what I enjoy about the process: a description prepared for the campaign becomes an image, then a 3D model and, a few steps later, a real miniature standing on the table in front of the players.
The Redbrands are now ready. My players, meanwhile, still do not know exactly what awaits them…
You can find our creation on MakerWorld: Fan Art – Redbrand Women on MakerWorld.
Transparency and rights
This article is not sponsored. The concept images were generated with ChatGPT, the 3D models were created with Meshy Pro, and I produced the prints and photographs myself. The creations shown here are intended for personal, non-commercial use.
“Creating Dungeons and Dragons Miniatures with AI and FDM” is unofficial fan content permitted under the Wizards of the Coast Fan Content Policy. It is neither approved nor sponsored by Wizards. Some of the material referenced belongs to Wizards of the Coast. © Wizards of the Coast LLC.
Leave a Reply